


After a long dry spell, the first rain off your roof can carry more than water. Dust, leaves, pollen, bird droppings and fine debris collect on roof surfaces and in gutters, then wash towards the tank when rain arrives. This rainwater first flush guide explains how a first flush system works, where it fits in your plumbing, and what to consider before choosing one.
For homes, farms and acreage properties that depend on stored water, a first flush diverter is a practical first line of defence. It does not replace a well-maintained roof, gutter protection or drinking-water treatment, but it can reduce the dirty runoff entering your stored supply.
What is a rainwater first flush diverter?
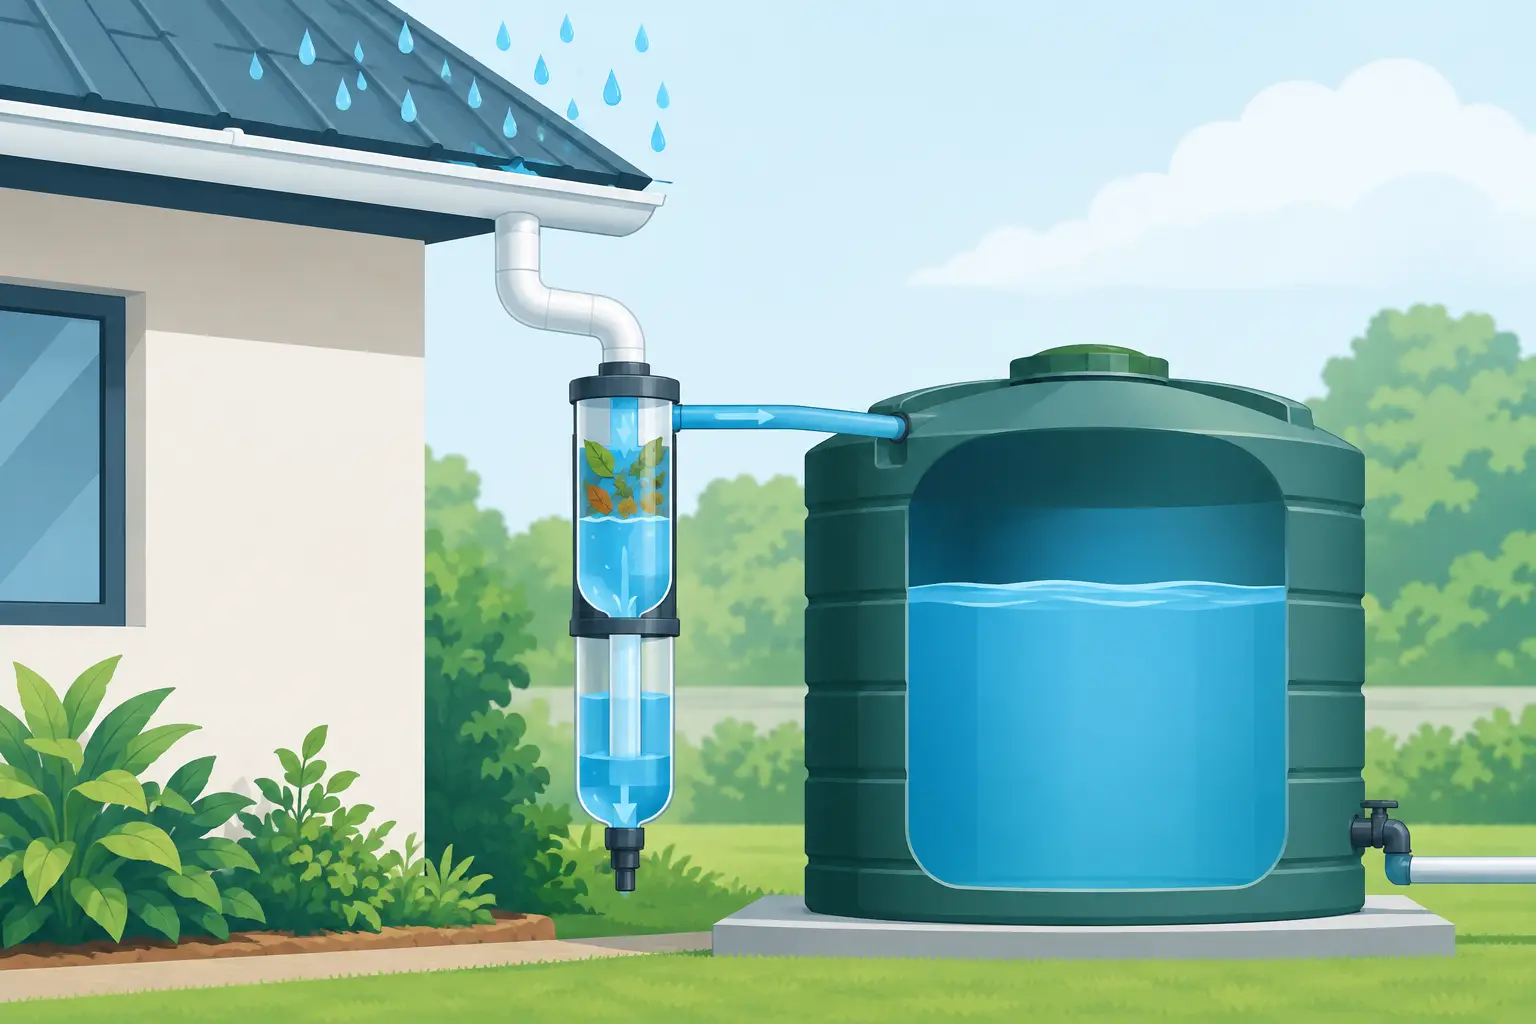
A first flush diverter is a section of pipe installed in the rainwater line before the tank. It captures the initial runoff from the roof, which is generally the dirtiest water after dry weather. Once this chamber is full, a floating ball or internal valve closes the diversion path and cleaner rainwater continues through to the tank.
Most common systems are simple and mechanical. Water enters a vertical chamber at the start of a shower, filling it from the bottom. When the chamber reaches capacity, the ball rises and seals the outlet. The remaining rainwater is then directed to the tank inlet.
At the bottom of the chamber, a small drain or bleed valve slowly empties the collected water after rainfall. This resets the diverter for the next shower. The drain rate matters: if it empties too quickly during light rain, it may not retain enough water to keep the initial runoff out of the tank. If it drains too slowly, it may remain full when the next shower arrives.
Why first flush matters for tank water quality
A clean roof catchment is the starting point for better tank water. Even a well-kept Colourbond or tiled roof accumulates airborne dust, ash, insects and organic matter between rain events. Coastal properties may also contend with salt spray, while rural properties can receive fine soil, pollen and agricultural dust.
Allowing this material into a tank can increase sediment, discolour water and add nutrients that support microbial growth. Debris also puts more load on tank screens, filters and pumps. The result can be more frequent filter changes, sediment build-up in the tank base and poorer water quality at the tap.
A first flush device is particularly worthwhile where the roof has regular leaf litter, nearby trees, birds, dusty access roads or extended dry periods. It can also be useful for holiday homes, sheds and outbuildings where gutters may not be checked as often.
There is a trade-off. Every litre diverted is a litre not stored, which matters when rainfall is limited and tank capacity is tight. The aim is not to discard large volumes of useful water unnecessarily. It is to remove a sensible amount of contaminated runoff for the roof area and site conditions.
Sizing a first flush system
There is no single diverter size that suits every property. The right capacity depends on the roof area feeding the downpipe, the amount and type of debris present, local rainfall patterns, and how the collected water will be used.
A small, clean shed roof may need only a modest diversion volume. A large home roof beneath gum trees, or a roof exposed to road dust, may benefit from a larger chamber or multiple diverters. If only one section of roof feeds a particular downpipe, size the device for that section rather than the entire roof area.
It is tempting to choose the biggest unit available, but oversizing can waste valuable water and may delay flow to the tank in short showers. Undersizing, on the other hand, means the dirtiest runoff can reach the tank before the diverter has done its job. Manufacturer sizing guidance and local rainfall conditions should be considered together.
Where several downpipes feed the tank, each line needs to be addressed. Depending on the pipe layout, that may mean a diverter on each downpipe or a correctly designed common diversion point before the tank. A single device installed on only one line will not protect water coming from the others.
Where to install a first flush diverter
Install the diverter downstream of the gutter and before the tank inlet. It should be accessible from ground level wherever possible, because it needs routine inspection and cleaning. A device tucked behind a shed or fixed high on a wall may work hydraulically, but it is less likely to be maintained.
The diverter should be mounted plumb so the ball seals properly and the chamber drains as intended. Use pipework of a suitable diameter for the roof catchment and expected flow. Restricting a large roof area through undersized pipe can cause gutter overflow during heavy rain.
The drain outlet at the base needs careful thought. Discharged first-flush water should run away from tank foundations, building footings and paths. Do not allow it to create erosion beside the tank slab or a muddy patch at the base of a stand. On rural properties, it may be directed to a suitable garden area or drainage point, provided it does not create pooling near structures.
A leaf diverter or gutter guard is still useful upstream. Large leaves can block gutters and downpipes before water reaches the first flush system. However, gutter protection does not stop fine dust, pollen or dissolved contaminants, which is why it should be treated as part of the catchment system rather than a replacement for first flush diversion.
Maintenance keeps the system working
First flush diverters are low-maintenance, not no-maintenance. Inspect yours after the first few significant rain events and then as part of regular tank and gutter maintenance. Open the bottom drain to remove sediment, check that the ball moves freely, and make sure the slow-release valve has not become blocked.
Check the chamber for mosquito access, cracked fittings and accumulated organic material. Screens and caps should fit securely. If the drain valve is clogged, dirty water may remain in the chamber for too long. If it is missing or left fully open, the device may fail to hold the intended first flush volume.
Gutters deserve equal attention. Remove leaf litter and check for pooling water, rusted sections and loose brackets. Trim branches where practical to reduce leaf load and bird activity over the roof. If you have recently completed roof repairs, painting, pressure cleaning or work that produces dust, consider bypassing or manually managing the first substantial runoff before collecting water for household use.
First flush is not the whole treatment system
For garden use, livestock supply or general wash-down water, a properly maintained first flush diverter may be one of the most effective improvements you can make to the catchment side of the system. For water used inside the home, particularly for drinking, cooking and bathing, it should be one part of a broader approach.
A tank inlet screen helps keep insects and larger debris out. A covered tank reduces light and contamination. Sediment filtration can protect household plumbing and improve water clarity, while finer filtration and UV treatment may be appropriate for potable supplies. The right combination depends on the source water, property use, household needs and any local health requirements.
Tank water that looks clear is not automatically suitable for drinking. First flush diversion reduces contamination entering the tank, but it does not guarantee the removal of microorganisms or chemical contaminants. If water quality is uncertain, seek advice on testing and suitable treatment equipment.
Choosing a practical setup
When selecting a diverter, look for durable materials suited to Australian outdoor conditions, compatible pipe sizes and fittings, a reliable ball or valve mechanism, and a drain arrangement you can service without fuss. Accessibility is often more valuable than a complicated design. A straightforward unit that is easy to inspect is more likely to protect your water year after year.
If you are adding a tank, pump, filters and rainwater accessories at the same time, plan the first flush arrangement before installation begins. It is far easier to position downpipes, drainage and tank inlets correctly at the start than to alter them once pipework is complete. North Coast Water Tanks can help property owners match practical tank, pumping and filtration components to the way their water supply is actually used.
A well-sized, well-maintained first flush diverter gives your tank a cleaner start every time rain returns. Put it where you can reach it, keep the roof and gutters in order, and treat it as a working part of your water system rather than an accessory you can forget.